Mike Powell, a good friend and photowalking buddy, left the following comment on my last post (First foray into focus stacking macro photographs):
You might consider including a shot of your setup (maybe with your phone), to help us visualize a little better your setup. Source Credit: Mike Powell.
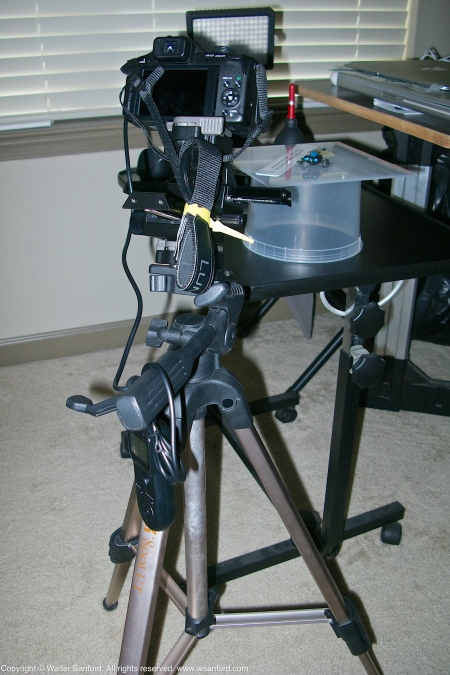
In response to Mike’s good suggestion, I decided to write a follow-up post featuring photos of the gear used to take the 13 macro photographs that were focus stacked to create a composite image of a toy damselfly finger puppet.
The previous post was, by design, rich with technical detail. My goal was to answer the overarching question, “How did you do that?” I chose to feature some of the macro photographs, rather than the gear I used to shoot the photos. By reminding me of the old cliche, “one picture is worth a thousand words,” Mike’s comment tells me I didn’t achieve my goal.
The following items are shown on the left half of the black table top, listed clockwise from the upper-left corner of the table:
- Sunpak LED-160 Video Light with a white translucent plastic filter, mounted on a Pedco UltraPod II Tabletop Tripod with Mini Ball Head using the “mini stand” from a Canon 580EX II Speedlite.
- Giottos Rocket Blaster Dust-Removal Tool
- Qudos Action Waterproof Video Light for GoPro HERO by Knog
- Universal adapter for Raynox DCR-250 close-up filter (not used)
- lens hood for Panasonic Lumix DMC-FZ150 superzoom digital camera (not used)
Yep, that’s what you think it is — a repurposed 1/2 gallon plastic ice cream container used to elevate the subject from the staging table. I placed the Qudos Video Light underneath the upside-down plastic container. An inexpensive intervalometer is shown hanging from the camera tripod.

Sunpak LED-160 Video Light turned on low power.
Look closely at the full-size version of the preceding photo. Notice the purple fringing that appears around the front panel of the Sunpak Video Light. The optical phenomenon is called chromatic aberration, color fringing that occurs sometimes in photographs of high contrast subjects such as the video light.
The following items are shown from left-to-right across the horizontal center of the preceding photo:
- Universal adapter for Raynox DCR-250 close-up filter (not used)
- Qudos Action Waterproof Video Light for GoPro HERO by Knog
- Giottos Rocket Blaster Dust-Removal Tool
The preceding photograph shows my Panasonic Lumix DMC-FZ150 superzoom digital camera mounted on a Neewer Pro 4-Way Macro Focusing Rail Slider using a couple of Manfrotto quick-release plates. Although the quick-release plates aren’t essential gear, they make set-up and tear-down easy and fast.
The camera was set for manual focus: For the first photo, coarse focus was achieved by physically moving the tripod into position; fine focus was achieved by racking the focus rail back-and-forth until the subject appeared to be in focus in a magnified view shown on the camera LCD. Next the focus rail was locked down. An inexpensive intervalometer was used to press the camera shutter button without causing camera shake. Manual focus method No. 2 was used for all remaining focus layers (see “Related Resource,” below).
The toy damselfly was placed on an 8″ square sheet of white 1/8″ thick 40% translucent acrylic plastic and lighted from below using a Qudos Video Light (not shown). I didn’t realize how far the toy damselfly’s nose sticks out ’til I looked at the preceding photo — no wonder its nose is slightly out of focus in my composite image!
A small plastic ruler is shown for scale. Anyone care to guess why the ruler from the Calvert Marine Museum is seven inches (7″) long rather than six inches?
Bottom line: The set-up looks and sounds more complex than it is in reality. Don’t let this deter you from experimenting with focus stacking macro photographs — it’s fun and the results can be rewarding!
Related Resource: Focus Stacking Tutorial for the Panasonic FZ200 and Raynox Close Up Lenses, a YouTube video by Graham Houghton. Two techniques for using manual focus are described in the video. I used the second manual focus method in order to fix the camera angle/position (15:52/25:58).
Copyright © 2015 Walter Sanford. All rights reserved.


September 2, 2015 at 6:36 am |
Thanks so much, Walter, for all the photos of your setup. I thought you might have used focus rails, but I wasn’t sure until I saw the photos. From what I have read, photo stacking is a whole lot tougher with hand held shots and even with a tripod. I was especially interested with your lighting and how you were able to illuminate your subject from underneath. I guess I will be forced to eat some ice cream if I want to replicate your arrangement. 🙂
September 2, 2015 at 11:17 am |
You said, “I guess I will be forced to eat some ice cream…” — artists must sacrifice for their art, you know. I made the sacrifice … happily! But seriously, the Neewer focus rails are a good bargain and work well. It’s possible to separate the two rails in order to reduce bulk and weight. (Graham Houghton shows how in the video linked from “Related Resource.”)
March 6, 2016 at 11:50 am |
[…] with new photography gear and techniques. For example, I spent a few days in the “BoG Photo Studio” recently experimenting with extension […]