The following product photos show the bottom of Godox X2T-series wireless flash triggers for Canon, Fujifilm, and Olympus/Panasonic digital cameras. The pin pattern on the flash triggers is the mirror image of the pin pattern on the camera hotshoe.
Notice the pin pattern varies by camera brand. One pin — the power pin — is located in the same place on all types of flash brands. The other pins are used to control functions such as Through The Lens flash metering (TTL) and High-Speed Sync (HSS). This is why almost any relatively new external flash unit can be used in Manual mode with almost any relatively new digital camera, but TTL and HSS are incompatible unless the flash is mounted on the hotshoe of a camera with a matching pin pattern.
Cross-compatibility among Godox TT-685-series external flash units
The beauty of the Godox system of external flash units is it’s truly a system — all units that I own and have tested extensively are cross-compatible.
For example, when a Godox TT685F for Fujifilm cameras is used off-camera it can be fully compatible with a Godox TT685O for Olympus and Panasonic cameras (including TTL and HSS functionality) when it’s fired by a flash trigger such as the Godox X2TO. It’s amazing to watch!
The following quick-and-dirty video is another demonstration of the cross-compatibily among Godox TT685-series external flash units.
A Godox TT685F flash for Fujifilm cameras is featured in the preceding video. The flash was fired remotely using a Godox X2TO wireless flash trigger for Olympus and Panasonic cameras.
An Apple iPad mini 2 was used to shoot a raw video clip that was post-processed using Apple iMovie. The magic wand tool in iMovie was used to automatically enhance the audio and video quality of the clip. Audio quality was improved significantly by the magic wand tool!
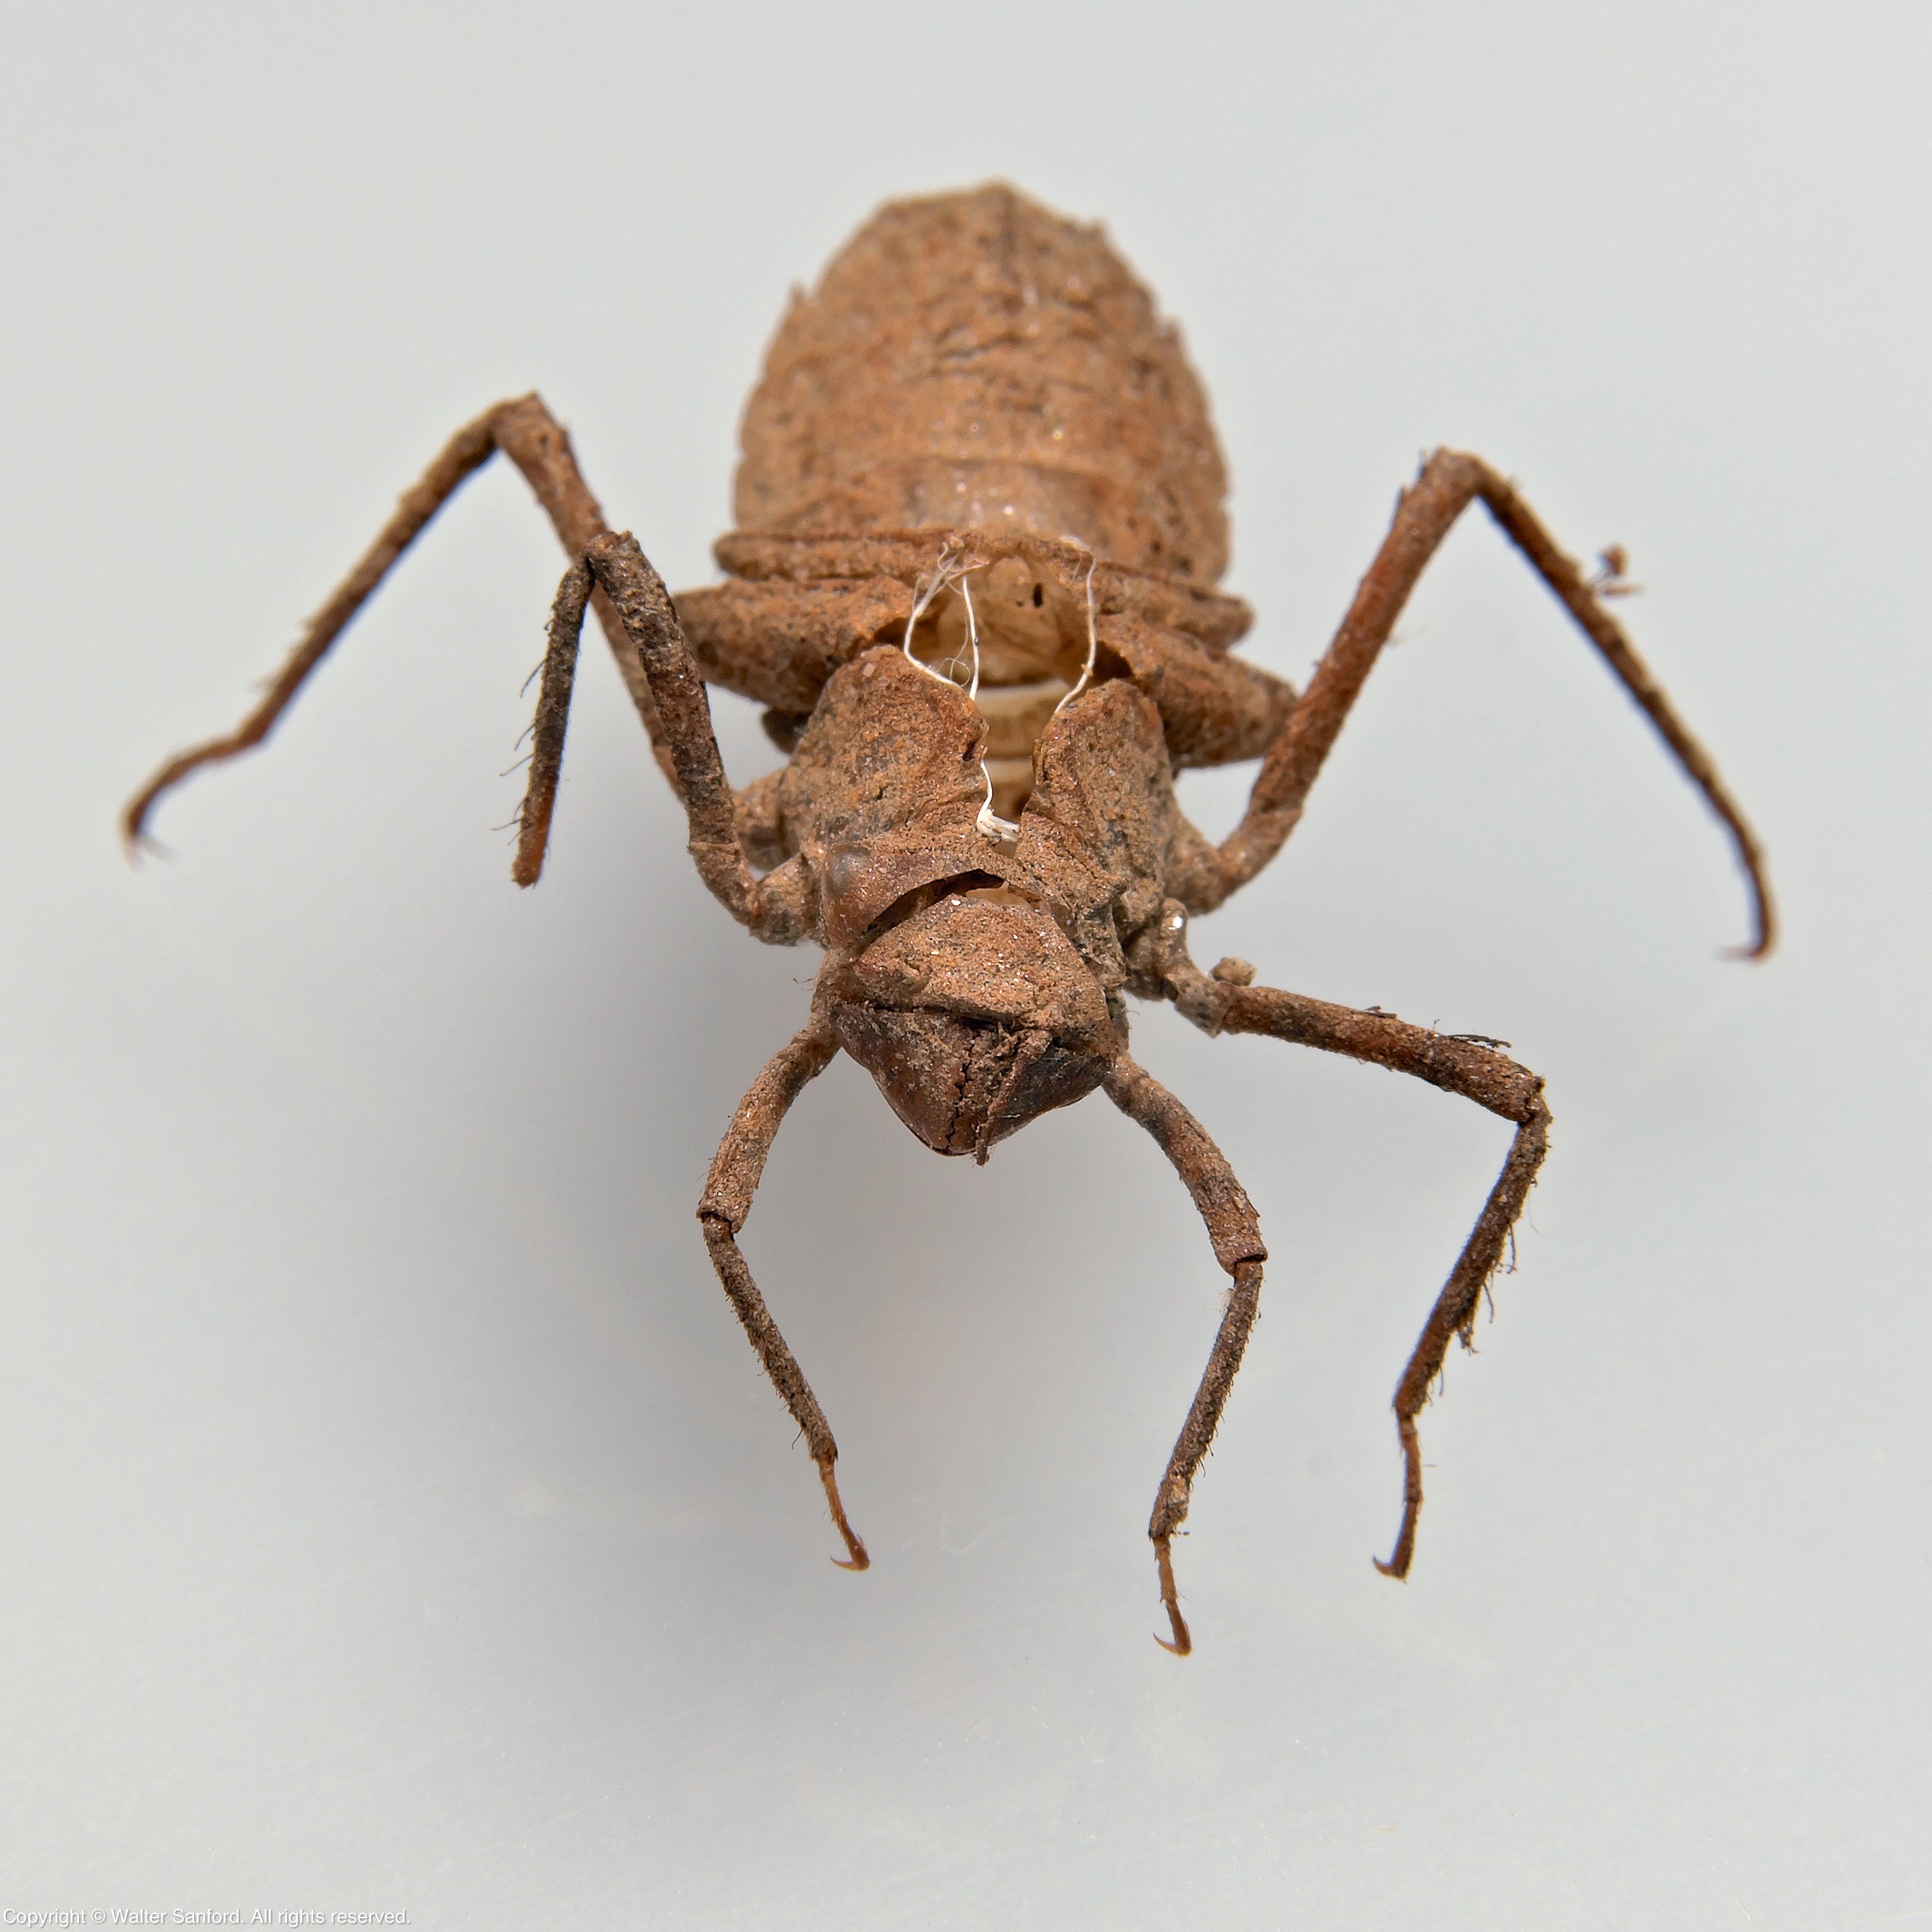
Michael Powell spotted a small odonate exuvia clinging to the base of one of two concrete abutments for a man-made dam located along a mid-size stream at an undisclosed location in Prince William County, Virginia USA.
I collected the exuvia in order to examine it more closely in my home laboratory/photography studio. Michael photographed the specimen in my hand immediately after I removed it from the abutment, as shown in the following photo.
Notice the dorsal hooks on abdominal segments seven through nine (S7-9). This distinctive character confirms the identity of the specimen as H. uhleri.
Another photo taken from the same view point, exposed and edited for more contrast, shows the three dorsal hooks a little more clearly than the preceding photo.
A dear friend sent an article to me years ago entitled “Knowing when good is good enough.” I think she was trying to tell me something.
I tend to be a perfectionist. For example, I’m a man on a mission to take the best possible macro photographs of odonate larvae and exuviae given the limitations of my photography gear and small home studio.
Sometimes perfection is a road block that prevents me from shooting and posting photos that are more than serviceable for my purposes, in this case, informal instruction.
I did a quick Google search for the article from my friend. No luck, but I found one that’s close enough — you might even say one that’s good enough — for a little self-help.
None of the photographs in this blog post are perfect — not even close! But I published them anyway. Baby steps, Bob.
Related Resources
How Do You Know What’s Good Enough? Can striving for perfection be freely chosen–not just compulsive behavior? by Leon F. Seltzer Ph.D., Psychology Today.
Some guides to the identification of odonate larvae and exuviae are measurement intensive. A caliper can be helpful for making measurements of a specimen quickly.
Carolina Biological Supply Company sells both analog and digital calipers. Analog calipers are relatively inexpensive and work well. Digital calipers can cost at least five times more than their analog counterparts.
Carolina sells two models of analog Vernier calipers: one model is made of nickel-plated steel; the other is made of plastic. The metal caliper has sharp edges and points that can scratch surfaces easily; the plastic caliper won’t scratch most surfaces.
The metal model comes in a plastic pouch; the plastic model doesn’t. Advantage metal model, right? No! Both the metal caliper and its plastic pouch are covered in some type of lubricant that is both unnecessary and a chore to clean off the caliper. Can you tell I prefer the plastic model?
Learning by doing – How to read the Vernier scale
How to Read a Metric Vernier Caliper by WeldNotes.com (7:01) is an animated video that explains how to read the Vernier scale of an analog caliper. Watch the video, then test yourself to see whether you can determine how far the bigger jaws of the caliper are spread apart (in mm), as shown in the preceding close-up photo.
Be careful — the Vernier scale shown in the video is precise to 0.02 mm while the one shown in the photograph is precise to 0.05 mm. Here’s a hint: The jaws of the caliper are slightly more than 11 mm apart.
Please submit your answer as a comment on this blog post. Relax, you won’t see any spoilers because all comments must be approved by the blog administrator. (Hey, that’s me!)
Post update
The answer key for the caliper quiz is now online.
The specimen is approximately 3.3 cm (~1.3 in) long, measured from head to tail. Notice the mid-dorsal hooks/spines located along the abdomen of the body.
At first I thought the exuvia might be a species from the genus Stylurus, based upon the mid-dorsal spine on abdominal segment nine (S9). After careful examination of two excellent photo-illustrated PowerPoint presentations by Kevin Hemeon at NymphFest 2016 (see Related Resources, below), I noticed none of the species in the genus Stylurus have dorsal hooks. That’s when I realized the specimen must be D. spinosus. Eureka! Source Credit: Dromogomphus spinosus exuvia – a blog post published on 28 June 2019 by Walter Sanford.
Related Resources
The following PowerPoint presentations by Kevin Hemeon are available in the “Files” section of the Northeast Odonata Facebook group. Direct links to the documents are provided below.
Odonate Exuviae – a hyperlinked list of identification guides to many species of odonate exuviae from seven families of dragonflies and three families of damselflies.
Tech Tips
The photograph featured in this blog post is a “one-off,” that is, a single photo rather than a focus-stacked composite image. The camera lens was set for f/16; the camera body was set for ISO 160 and a shutter speed of 1/250 s.
Two external flash units were used to create the white background by cross lighting the front of a piece of white plastic; another flash was used to light the subject. A Sunpack LED 160 was used as a focusing aid.
RAW FILE CONVERTER EX 3.0 was used to convert one RAW (RAF) file to a TIFF file. The TIFF file was edited using Apple Aperture and sharpened using Photoshop.
Male odonates have two sets of sex organs: primary genitalia located on abdominal segment nine (S9); and secondary genitalia located on abdominal segments two-to-three (S2-3).
This male specimen has too much dirt on S9 to see the primary genitalia; the secondary genitalia are visible on S2-3. I plan to annotate the image in order to highlight select anatomical features.
Odonate Exuviae – a hyperlinked list of identification guides to many species of odonate exuviae from seven families of dragonflies and three families of damselflies.
The subject was photographed against a pure white background (255, 255, 255) using the “Meet Your Neighbours” (MYN) technique. The exposure was increased by 0.3 stop during post-processing in order to attain a pure white background.
One external flash unit was used to create the white background and two others to light the subject. A Sunpack LED 160 was used as a focusing aid.
RAW FILE CONVERTER EX 3.0 was used to convert six (6) RAW (RAF) files to TIFF files. In a departure from my usual workflow, the TIFF files were loaded into Adobe Photoshop CC 2017 in order to create the focus stacked composite image. The composite image was edited using Apple Aperture and sharpened using Photoshop.
Tech Take-aways
Notice there is some color fringing (mostly reds) that is especially noticeable on the front legs and antennae, as well as along the edges of the posterior abdomen. I have been experimenting with a new technique for backlighting the subject. It appears I need to add another layer of diffusion between the light source and the subject.
There is also some “softness” along the edges of the abdomen that could be the result of too few focus points for the shape of the body, which in turn, could have caused artifacts in the composite image.
I thought I had figured out how the “FUJIFILM Tether Shooting Plug-in PRO (Mac)” does automated focus bracketing. My working theory was (past tense) the plug-in commands the camera body/lens to move from one auto-focus (AF) focus point to another, based upon the two end-points selected by the user. So I devised a test for my theory. Turns out I was not only wrong, but I’m more confused than ever based upon my test results!
My theory arose from the observation that the focus point changed from the beginning to end of every focus bracket test shoot. For example, the first end-point was near the following focus point…
and the final focus point was near the last end-point.
My camera is set to display 425 AF points. There are 25 AF points in each row, as shown in the first photo.
For the first set of test shots, the plug-in set the number of shots to three (3). That made sense at the time, since I could have selected three AF points manually and covered the image well enough so that the entire subject is acceptably in focus at an aperture of f/16.
During the next two sets of test shots, I selected the same end-points but the plug-in wanted to set the number of shots to greater than 180 photos for both tests. No way I was going to shoot that many photos since my theory was a bust — 180 shots far exceeds 25, the number of AF points in a single row.
Perhaps the number of shots has something to do with the function of the slider for each eye dropper, but I don’t know — I haven’t figured out how the sliders work. (Anyone? A little help, please.)
Alvin
A toy Alvin (the Chipmunks) was photographed against a pure white background (255, 255, 255) using the “Meet Your Neighbours” (MYN) technique.
02 FEB 2021 | BoG Photo Studio | toy Alvin (the Chipmunks)
9 photographs were taken using a Fujifilm X-T3 digital camera, Fujifilm MCEX-11 extension tube, and Fujinon XF80mm macro lens, including a set of three photos from my first automated focus bracket test shoot plus some test shots before/after the focus bracket.
The photos were edited using Apple Aperture, exported as TIFF files, then loaded into Adobe Photoshop CC 2017 in order to create the focus stack.
I changed the orientation of the ruler featured in my last blog post and used the “FUJIFILM Tether Shooting Plug-in PRO (Mac)” to shoot another set of automated focus bracketing test photos. The ruler was aligned with the barrel of the camera lens, sloping downward gradually as the distance from the lens increased.
Based upon the end-points I selected, the plug-in set the number of shots to 11. The following slideshow shows photo No. 1, No. 6, and No. 11. The focus point moved along the ruler from back-to-front, opposite from the order in which I set the end-points. In other words, End-point 1 (located somewhere near the bottom of the photo) is photo No. 11 and End-point 2 (located near the middle of the photo) is photo No. 1. Is that a Fuji thing? Further testing required.
This slideshow requires JavaScript.
In case you can’t see each image clearly in the slideshow, here’s a gallery of larger versions of the photos through which you can move forward/backward manually. Click on any photo, then use the left and right arrows to cycle through the gallery.
No. 1 (of 11)
No. 6 (of 11)
No. 11 (of 11)
Finally, here’s a focus stack of all 11 photos. I created a quick-and-dirty composite image using Adobe Photoshop CC 2017 plus the 11 JPGs straight from my camera (without any editing).
What looks like “ghosting” isn’t — the numerals and tick marks are raised above the surface of the ruler.
I don’t see any noticeable “focus gaps” from the middle to lower part of the ruler (relative to the photo) where my end-points were set. That’s a good thing!
As always, a small sample size is insufficient to declare success but the proof-of-concept is established and so far so good (he said with fingers crossed).
My Fujinon XF80mm macro lens lens was set for less than its maximum magnification ratio of 1:1. I’m curious to see how the plug-in performs when using macro lenses that feature auto-focus and a magnification ratio of greater than 1:1. On second thought, both of the high-magnification lenses I own are manual focus only. Perhaps one of my readers can comment.
Adobe Lightroom Classic doesn’t support tethering with my Fujifilm X-series digital cameras (X-T1 and X-T3), that is, unless you buy a plug-in from Adobe. The plug-in is available in two versions: Standard ($29.00); and Pro ($79.00). I recommend the Pro version. The plug-in runs on my 11″ MacBook Air (Intel processor, 2011); it DOES NOT run on my new 13″ MacBook Air (M1 processor, 2020) although both Adobe and Fujifilm report they are working to update both Lightroom Classic and the plug-ins to be compatible with the Big Sur macOS.
Documentation
FUJIFILM Tether Plug-in PRO – Features — page one of a set of nine Web pages — is the only documentation for the plug-in that I have been able to find. We might say it’s a work in progress although I can’t say that I know anyone actually is working on updating the guide.
The Pro version of the plug-in features two modes: CAMERA mode; and PC mode.
In CAMERA mode, your camera operates as it does when it isn’t tethered to a computer; a view of your last shot is shown on the right side of the window. (See the following screen “Grab.”) The areas shaded in red are over-exposed. That’s good, since I want the background to be pure white.
In PC mode, the camera is controlled by the computer; press the LIVE VIEW button to see a Live View from your camera. The following screen “Grab” shows the plug-in in PC mode, LIVE VIEW.
Automated Focus Bracketing
FOCUS BRACKETING is a feature of the plug-in of particular interest for me. Eye droppers can be used to set two (2) end-points: End-point 1; and End-point 2.
Specify one end of focus-bracketing range as End-point 1 and the other end as End-point 2. Click on applicable positions on your image, using the eye dropper tool, to specify the end points. Source Credit: Using the Control Panel in the PC mode (operation from Mac or PC).
The function of the slider for each eye dropper is unclear to me. (Anyone? A little help, please.)
As far as I can tell, the user has no control over the number of shots in the bracket — it appears to be set by the software automatically based upon the user-selected end-points. For example, the following screen “Grab” shows the camera will take seven shots based upon the end-points I selected. My camera is set to display focus peaking (in red). It’s possible the focus peaking provides a visual display of the part of the photo that will be in focus based upon the end-points I selected. Then again, the focus peaking might just show what will be in focus for a single shot. I’m thinking it might be helpful to use dots on a screen overlay in order to display the user-selected end-points.
A feature conspicuously missing from the FOCUS BRACKETING settings panel is the option to set an interval between shots. This is especially important for flash photography because it’s necessary to pause between shots for the flash units to power-cycle. Some time between say 3-5 seconds is long enough for many (if not most) external flash units to recharge to full power. Lacking this option, a Godox PROPAC PB960 was used to power the two Godox TT685 flashes that lighted this test shoot. (See “Burst mode flash photography” for a demonstration of the power recycle rates possible with the PB960 external power pack.
Full disclosure: Before I began the FOCUS BRACKETING test shoot, I set my Fujifilm X-T3 to use a two-second timer. I have no idea whether the timer was working during the test shoot. I need to try again using a 10-second timer to be sure. Point being, if the timer works during automated focus bracketing using the plug-in then it could compensate for the lack of an interval setting in the FOCUS BRACKETING settings panel. POST UPDATE: A 10-second timer was set BEFORE a tethered session was started. I’m pleased to report my interval work-around works!
Not to belabor my point (too late?), it’s interesting to note that in-camera focus bracketing allows the user to set a step size, the number of shots, and an interval between shots. For more information about in-camera focus bracketing, see the link from the Related Resources to a video by pal2tech. In-camera focus bracketing has two big disadvantages: 1) the user can set only one end-point (the beginning point); and 2) setting both the step size and the right number of shots in the bracket is a guessing game at best.
What are the take-aways?
I shot two sets of focus bracketing test shots: a set of three (3) photos at f/16; and a set of seven (7) shots at f/8. I used a purple plastic 12″ ruler as the subject, thinking it should be easy to see where each photo is in focus. Problem is, I posed the ruler poorly and it’s not easy to see the focus/out-of-focus areas from one photo to the next. I need to try the test again with the ruler aligned along the lens barrel. POST UPDATE: I changed the orientation of the ruler and shot another set of focus bracketing test photos. The 11-photo set clearly shows the focus point moved along the length of the ruler. Details in my next blog post.
Is automated focus bracketing using the plug-in better than in-camera focus bracketing? I don’t know, but I think it’s worth further exploration.
Congratulations to Sherry Felix, a regular reader of my blog who seems to have correctly identified my toy dinosaur: It’s a Monoclonius. Good work, Sherry!
The toy Monoclonius was photographed against a pure white background (255, 255, 255) using the “Meet Your Neighbours” (MYN) technique. The toy is 2.42 cm long.
I prefer using single point focus in most situations. In this case, the focus point was centered over the right eye of the subject. Notice the entire subject isn’t in tack sharp focus despite using an aperture of f/16, but hey, at least the eye is in focus!
OK, here we go again — it’s time for another toy dinosaur related episode of “What is it?”
We know it’s a toy dinosaur (and this time I’m fairly sure it is really a dinosaur). Question is, what kind of dinosaur? When I was a young boy, my collection of toy dinosaurs included at least one Triceratops but I can’t recall any toy dinos with only one horn.